Setting Up Double Opt-In Confirmation Emails in Flodesk
Table of Contents
ToggleSharing is caring!
Reading Time: 3 minutes


A double opt-in confirmation email adds a personal touch to your marketing campaign. Here’s a step-by-step guide on setting up a confirmation email in Flodesk.
Now that your marketing efforts are finally paying off, you're ready for step 2, monetizing your website by building an email list. What is an email list, and why should you have one?
A mailing list refers to the people who are willing to sign up for your subscription service. These people are potential customers; they are willing to go the extra mile (providing their email address) to get more content out of your website. Since these people don't need much cajoling to make a purchase, you don't have to work hard to get them to take the desired action.
Imagine having hordes of subscribers who are willing to make a purchase every time you launch a promotional campaign! That’s what building a mailing list can do for you. If you are a Flodesk user, you’d be surprised how easy it is to set up a double opt-in page. But first, a little context:
Grab a 30-day free Flodesk trial here
What is an Opt-In Page?
The first step to building a mailing list is creating an opt-in page. The opt-in page is a static or pop-up page that readers fill in to collect contact details for future marketing. People fill the opt-in page with their name, email, and sometimes, their website pages in exchange for an incentive. The incentive could be anything from a small discount to free content like a newsletter or an ebook.
What is a Double-Opt-In Confirmation Email?
A double opt-in email presents an additional step to confirm the online users’ interest in receiving future marketing content from you. It comes in the form of an email sent to your address after subscribing to a website. There is usually a button or a link in the email that you click to verify your email and confirm your subscription. The link leads to a short “Thank You” message.
Why is a double opt-in important?
Generally, online users are very impatient; they won’t bother filling in the opt-in page unless they are genuinely interested in whatever you have to offer. If the users are willing to take this extra step, that’s a sure-fire sign that they are incredibly interested in whatever you have to offer!
How to Set Up Double Opt-in Confirmation Emails on Flodesk
If you’re using Flodesk, creating an opt-in confirmation email is a breeze. Just be sure to keep these requirements in mind:
- Enable the opt-in feature of your sign-up form
- Create a confirmation email
- Create a “Thank You” page
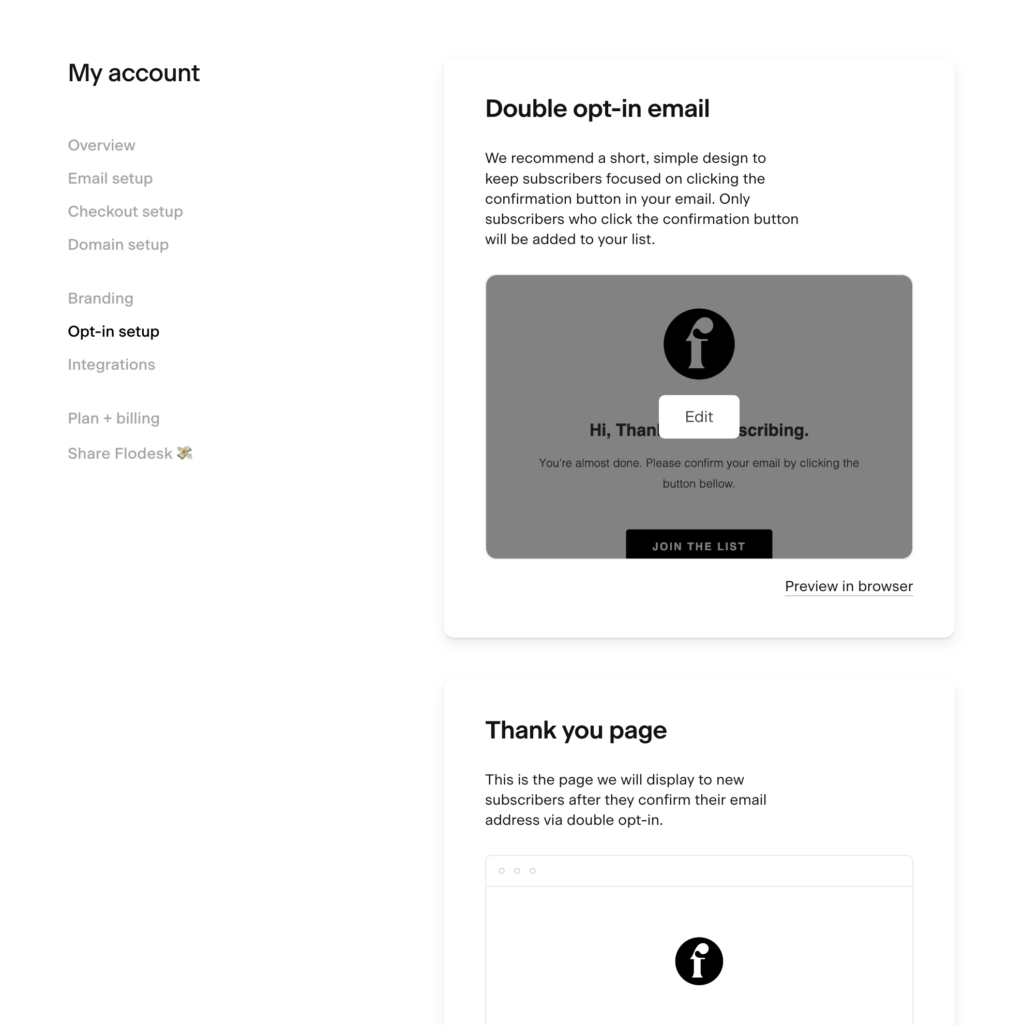
From your Flodesk dashboard, go to Account > Brand preferences. Scroll to the bottom of the page. On your right, you will see two options, “Double Opt-In Email” and “Thank You Page.” Here’s how to customize each one:

Customising the Double-Opt-In Email
Click the customize button to create your opt-in page; there are several templates to choose from. You can tinker with the page elements to personalize the opt-in image, such as adding a logo, filling in the opt-in template with more text, and so on. You cannot edit the subject line of the confirmation email. Also, you cannot add any links to the email. The confirmation email is short and straightforward.
Customising the Thank You Page
This is simply a page that lets subscribers know that they've been added to your mailing list. Click the “view” link to customize. From there, you can edit the texts, upload your logo, or add your personal message. Each time a subscriber hits the double-op-in email, they will be led to this page. Once you're done with the customization, you can save your work by clicking the “Finished” link.
The final step is adding the double opt-in confirmation to your sign-up form. To do this, go to the “Forms” section. You can either add the form or create a new one. If you're creating a new form, you'll choose a template or make your own from scratch, then select the segment you'd like to send the message to.
If you are using an existing form, just hover the mouse over the form you'd like to edit and click the “…” on the upper right side of the screen. Choose “Customize,” and you'll be able to tinker with the settings. Choose the option that enables the double opt-in email feature, click confirm, and add the form to your website.
We highly suggest doing a test run to see if the double opt-in email and the thank you page look good. Once that's done, you're ready to usher new subscribers to your email list! So easy, right? Try it today and let us know what you think!
Grab a 30-day free Flodesk trial here
Most Popular Posts:
Sharing is caring!
[…] marketing simple then I would still start here as it’s free. Sign up, create a list and then create some opt-in forms for people to leave their email address. If you have a freebie you can add this to your welcome […]
[…] opt-in form serves as the invitation for website subscribers to sign up for your online community. You […]
Thank you! I followed these steps, however my newly designed + branded versions that I created will not send out to my subscribers. Instead, they get a standard, design-less opt in form and confirmation. Any idea why? How do I ensure the forms I’ve designed are published and will send out?
Hi Aislinn,
That’s a great point! You’ll need to customise your double opt-in and thank you page within your Flodesk account. To do this go into your account settings and go to “brand preferences”. In here you will be able to customise both your double email opt-in page, and the thank you page.
I hope that answers your question.