NU


A Guide to Creating Email Opt-In Using Flodesk
Flodesk is one of the most user-friendly email marketing platforms in the business, and we’re sure you will love it as much as we do! Email marketing platforms are a dime a dozen, but Flodesk stands out for its beautiful, professionally designed email layouts and opt-in forms.
If you’re a beauty blogger, an aspiring fashion and lifestyle influencer, a travel vlogger, or an entrepreneur who wants to wow your audience with on-brand, stylish, sleek, and contemporary opt-in forms. In that case, you’ll find that Flodesk offers some of the best-looking designs out there.
The best part is that setting up your account and creating an email opt-in page is easy. It will only take a few minutes and requires ZERO coding on your part. Here’s a quick walkthrough on creating your first email opt-in using Flodesk:
A Step-by-Step Guide to Creating Email Opt-In Using Flodesk
Start with a Freebie
Your freebie or incentive is the hook that will compel readers to subscribe to your email opt-in. Most people are wary of giving their personal details away, so they’ll need something to get out of providing their email addresses.
You want a freebie that’s actually helpful to your readers, something that focuses on the problems that your core audience is dealing with at the moment. The freebie doesn’t have to be expensive, but it should solve the problem that your readers are going through.
Create a Flodesk Email Opt-In Form
On Flodesk, there are many different types of opt-in forms. These are:
- Inline
- Full page
- Pop-up page
- Link in bio
- Video
- Spinner
- Countdown
Which one to choose? It really depends on what style you want to go with or the purpose of the content. Inline forms or ribbon banners in inline style are often set at the footer of a website to collect newsletter sign-ups. If you want to attract more people to your sign-up form, we suggest choosing between a full-page or pop-up form.
A full page is similar to a landing page, while a pop-up page is just that, a page that briefly pops up on the screen to collect sign-ups.
Before creating the email opt-in form, you must create a segment on Flodesk. All the people who subscribe to the opt-in form will be added to this segment. Flodesk will always ask you to create a segment before making any type of opt-in form to customize.
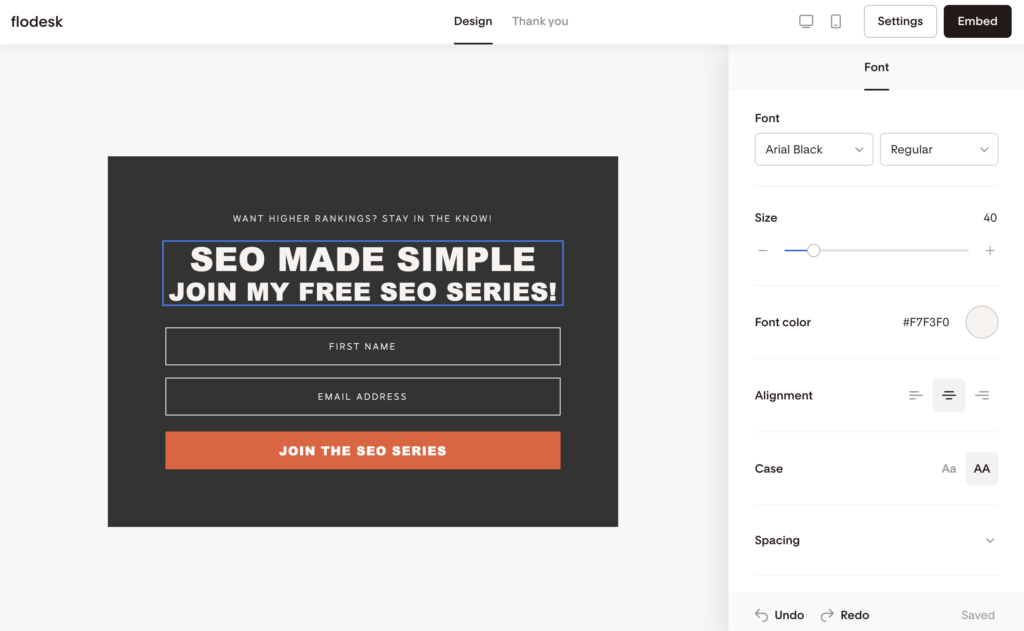
Customize Your Email Opt-In Form
Flodesk opt-in forms are easy to customize. To create an on-brand email opt-in, edit the following:
- Heading and sub-heading
- Name and email fields
- Sign up button
- Privacy policy
- Background color
- Text style
- Images
If you don’t have brand fonts, Flodesk has dozens of beautiful fonts to choose from. As for the heading, this is the title of your opt-in form. You can write a short description in the sub-heading and then set the email fields. You can also use Flodesk’s default font text with your own if you like. Whatever visuals you use for customization, be sure it’s either a transparent file or the background matches the form’s color for cohesiveness.
Flodesk has its own template messages for various actions, such as redirects or welcome emails, but you can create one or tweak the existing texts to make the message more personalized.
Publish the Email Opt-In Form
The last step in creating an email opt-in form is publishing it. On Flodesk, there are different publishing options, depending on the form. You can create a URL for full forms, which you can share on various marketing platforms. If you’re sharing links, use a link shortener like PrettyLinks to make the URLs visually appealing.
For inline and pop-up forms, these can be shared through a code snippet. You’ll need to embed the codes on your website to promote them. Some marketing platforms let you embed the code directly too.
Tips: Setting up a Freebie Delivery Workflow on Flodesk
After publishing your email opt-in form, you must set up a delivery workflow to keep things organized as people sign up. That said, this step can be skipped if you’re creating the form simply to collect newsletter signups without freebies. This step is only suitable if you’re offering something in return for the signups.
When creating a delivery workflow on Flodesk, you can offer a redirect link after a subscriber submits the completed form or deliver the link to the freebie via email. This is a matter of preference. One thing though, if you chose the latter, you’ll need to set up a trigger so that the email will be sent to their email address once they are added to the segment you created for the form.
We suggest creating a combination of a welcome sequence and a nurture sequence. The welcome sequence activates after a subscriber sign up, and it will include a welcome message, a walkthrough, or an orientation of sorts to guide new members through. The nurture sequence is a series of emails that will help build trust among subscribers and encourage renewed interest down the funnel.
Both welcome and nurture sequences can be set up on Flodesk, and there are email templates that you can simply edit and customize before adding them to your workflows. You’ll need to create a series of on-brand visuals to go with your welcome and nurture sequences. We suggest checking out Canva, an online photo editing tool to create and customize the images.
The final step to creating a successful email opt-in on Flodesk is spreading the word about it! Post your opt-in on your website, portfolio, social media, and anywhere that will attract more attention and, potentially, signups!
As you can see, creating an email opt-in using Flodesk is a breeze; it’s practically effortless. Try it today and start growing your email list with gorgeous forms that will never fail to impress!

PLEASE COMMENT BELOW